VS Code 란? (Visual Studio Code)
- MS에서 제공하는 크로스 플랫폼 에디터로 다양한 언어를 서포트 하며, IntelliSense와 Git 기능, 그리고 Extension 을 이용한 확장 기능을 제공하고 있다.
- Atom, Brackets 등과 유사.
설치방법
Windows
- https://code.visualstudio.com 에 접속하여 다운로드 후 설치
Visual Studio Code - Code Editing. Redefined
Visual Studio Code is a code editor redefined and optimized for building and debugging modern web and cloud applications. Visual Studio Code is free and available on your favorite platform - Linux, macOS, and Windows.
code.visualstudio.com
설치 시 아래와 같은 페이지에서 기타에 모두 체크한다.

단축키 정리
- ctrl+p : 파일이나 기호를 탐색
- ctrl+shift+tab : 마지막 연 파일에 접근
- ctrl+shift+p : 편집기 명령으로 바로 이동
- ctrl+shift+o : 파일의 특정 기호로 이동
- ctrl+g : 파일의 특정 행으로 이동
- ctrl+p 를 눌러 ?를 입력하면 명령창에서 행할수 있는 명령 목록이 나온다.
- ctrl+p : 모든 파일을 단축키로 빠르게 열수 있다. (빠른열기)
- ctrl+shift+m : 상태표시줄, 에디터 하단에 현재 상태를 표시
- ctrl+s : keyboard shortcuts 열람.
- ctrl+, : 기본설정, vscode 의 모든 설정은 파일>기본설정>설정에 지정
- ctrl+shift+x : 확장프로그램, 확장 기능 마켓 플레이스에서 다운로드해서 사용
- ctrl+b : 사이드바 전환
- ctrl+k, z : 젠모드
- shift+alt+up , shift+alt+down : 행복사
- ctrl+\ : 나란히편집, 에디터를 둘 또는 셋으로 나란히 놓고 사용할 수 있다.
- ctrl+shfit+[ , ctrl+shfit+] : 코드 접기/펴기
- ctrl+shfit+v : 마크다운 미리보기
- ctrl+shift+F: 현재 프로젝트 전체 파일에서 검색
기본적인 Setting
- 우선, Ctrl + P 를 누르면 파일 find 및 Command 를 입력할 수 있는 창이 생긴다. (바로 Command를 입력하고 싶다면 F1을 누르면 된다.)
(1) 언어 Setting
- VS Code 사이트에서 툴을 다운로드 받으면 디폴트로 본인 브라우저의 Locale 정보를 이용하여 언어가 세팅되어 진다.
- 혹시 이 언어를 바꾸고 싶다면, Ctrl + P 를 누른 다음 > Configure Language 에서 원하는 언어로 바꾸면 된다.
(2) theme Setting
- F1 > theme 입력 후 테마를 선택.
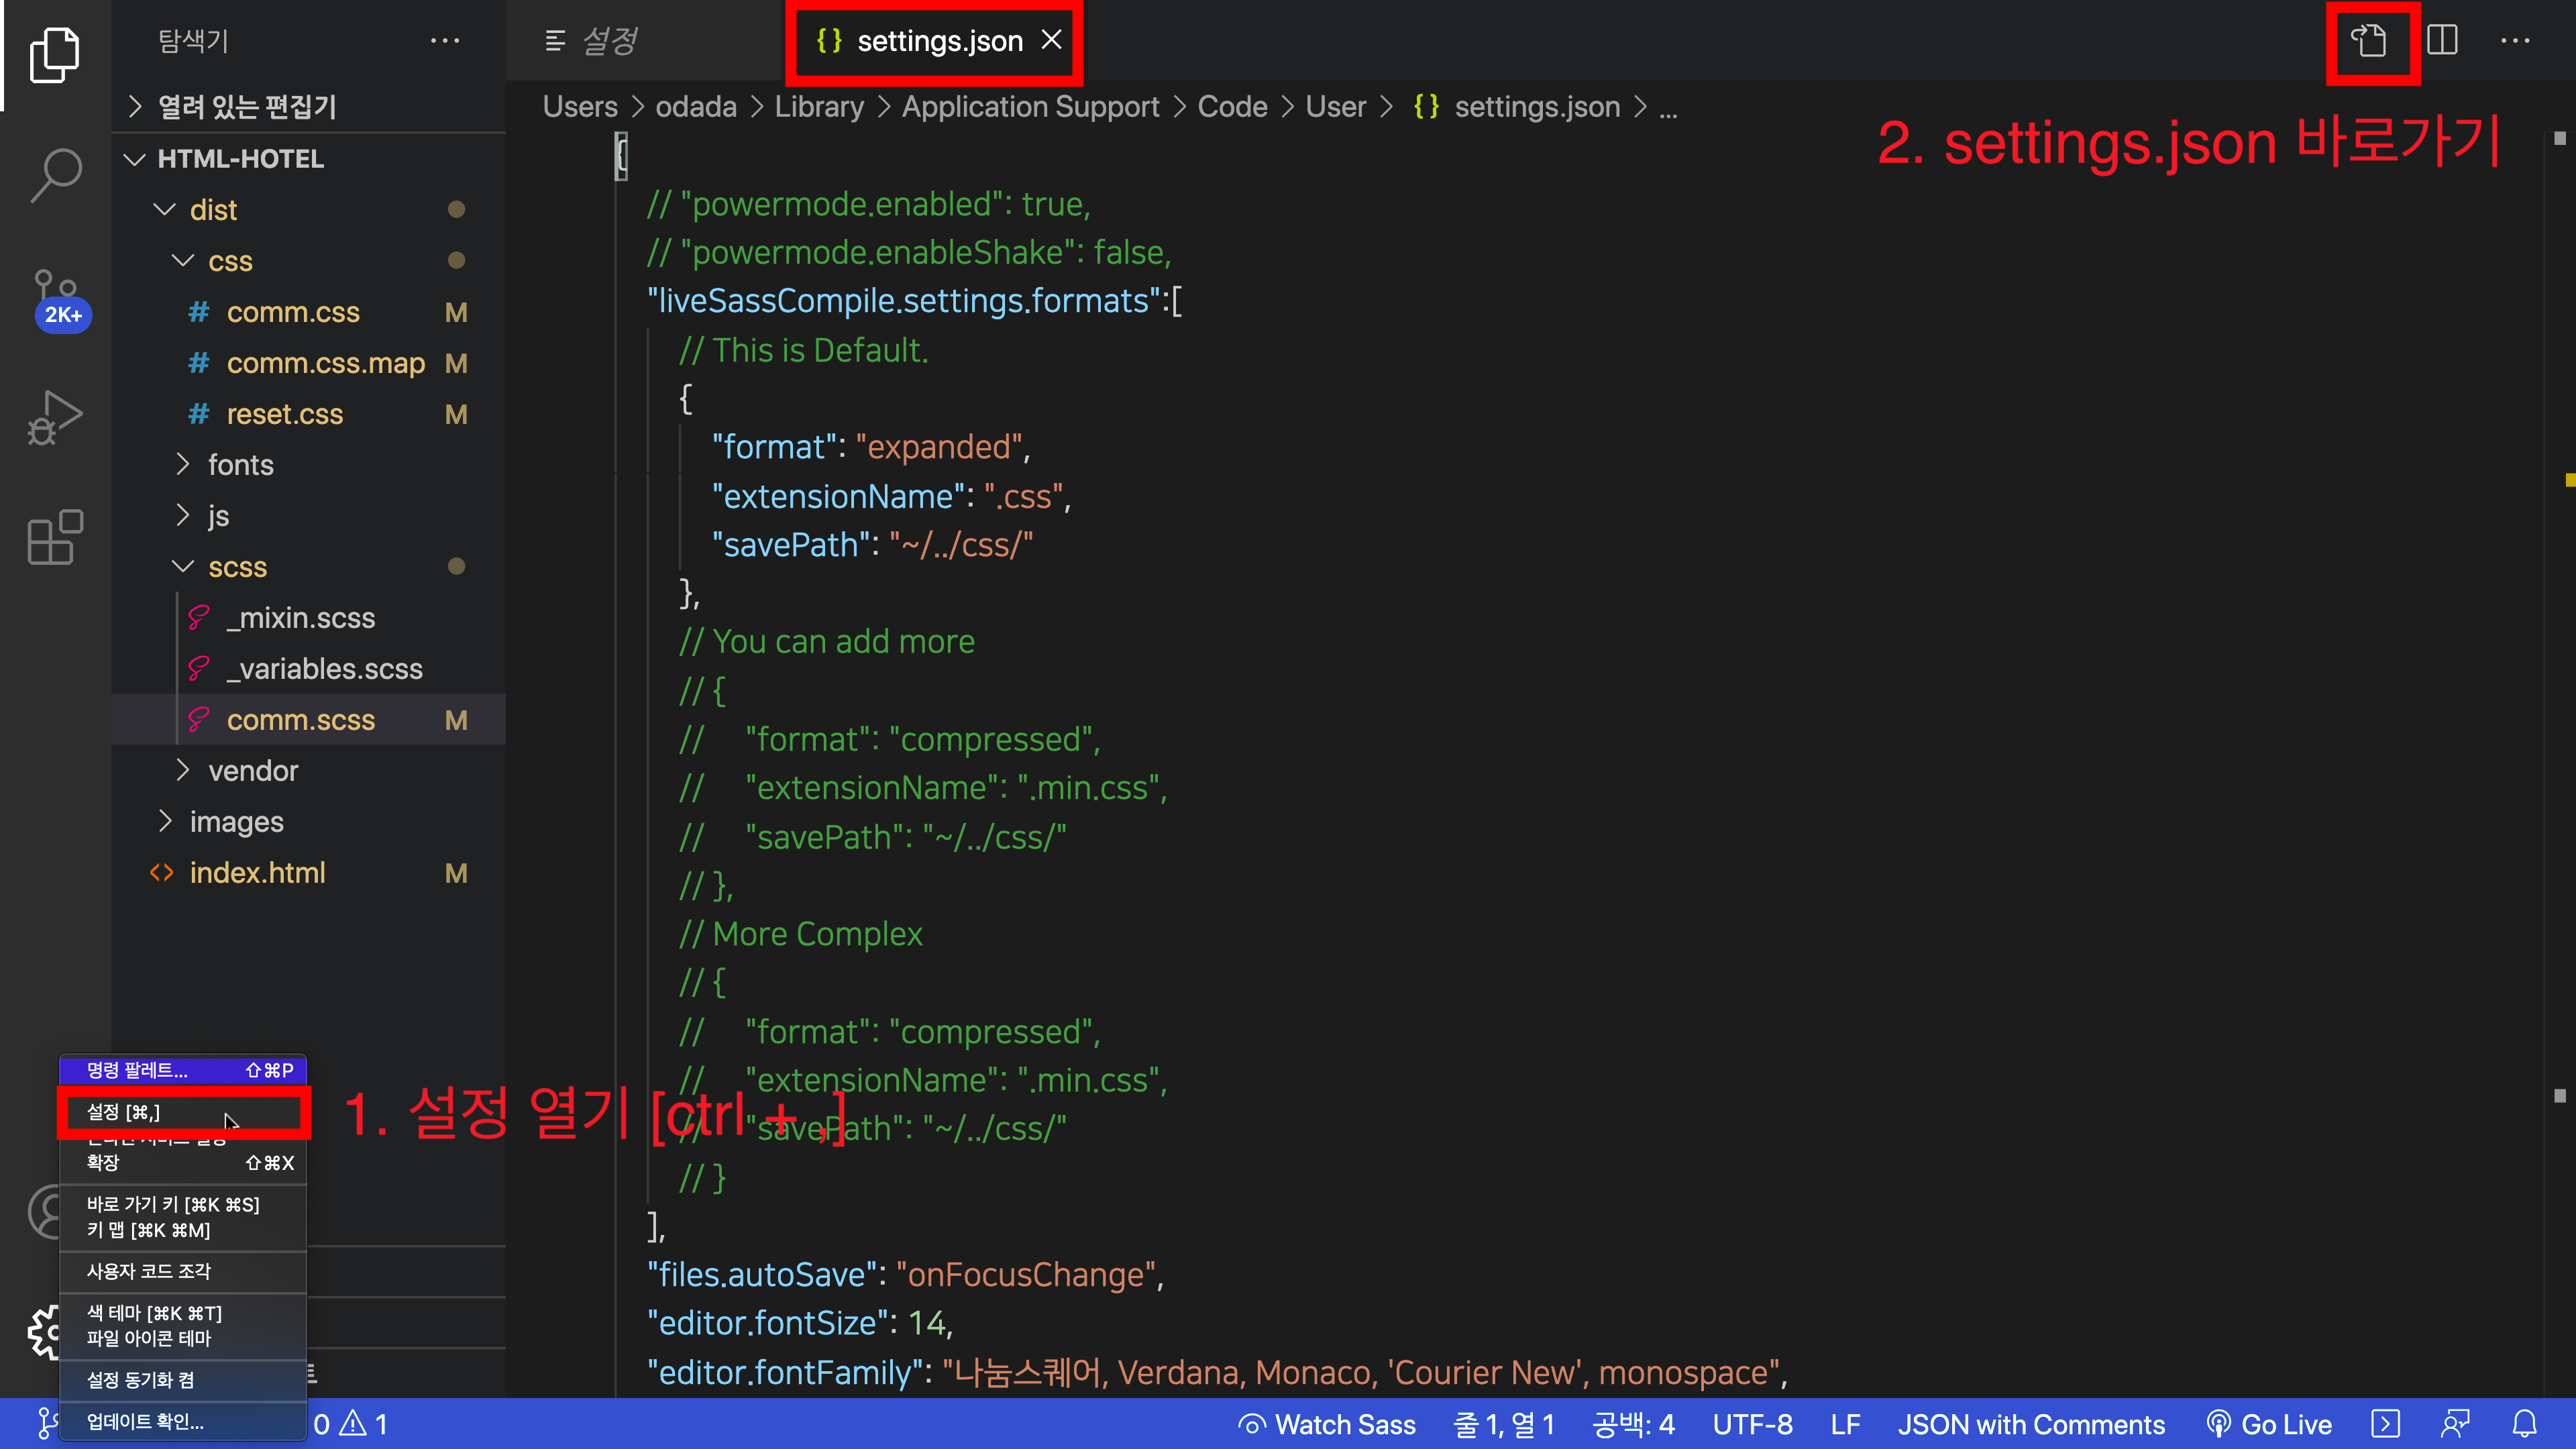
(3) settings.json Setting
settings.json 파일을 열어 기존에 있던 코드를 모두 지우고 아래 코드를 붙여넣는다.

{
    "liveSassCompile.settings.formats":[
        {
            "format": "expanded",
            "extensionName": ".css",
            "savePath": "~/../css/"
        },
        // {
        //     "format": "compressed",
        //     "extensionName": ".min.css",
        //     "savePath": "~/../css/"
        // },
    ],
    "files.autoSave": "onFocusChange",
    "editor.fontSize": 14,
    "editor.fontFamily": "나눔스퀘어, Verdana, Monaco, 'Courier New', monospace",
    "editor.mouseWheelZoom": true,
    "window.zoomLevel": 0,
    "javascript.updateImportsOnFileMove.enabled": "always",
    "liveServer.settings.donotShowInfoMsg": true,
    "editor.minimap.enabled": false,
    "git.autofetch": true,
    "editor.wordSeparators": "`~!@%^&*$()=+[{]}\\|;:'\",.<>/?",
    "highlight-matching-tag.styles": {
        "opening": {
            "left": {
            "underline": "yellow"
            },
            "right": {
            "surround": "#155FFA"
            },
            "name": {
            "highlight": "rgba(180, 20, 80, 0.3)"
            }
        },
        "closing": {
            "full": {
            "custom": {
                "dark": {
                "borderWidth": "0 0 1px 0",
                "borderColor": "white",
                "borderStyle": "solid",
                "borderRadius": "4px",
                "right": "10px"
                },
                "light": {
                "borderWidth": "0 0 1px 0",
                "borderColor": "brown",
                "borderStyle": "solid",
                "borderRadius": "4px",
                "right": "10px"
                }
            }
            }
        }
    },
    "liveServer.settings.donotVerifyTags": true,
    "emmet.syntaxProfiles": {
        "javascript": "html"
    },
    "editor.codeActionsOnSave": {
        "source.fixAll": true
    },
    "files.associations": {
        "*.js": "javascriptreact"
    },
    "editor.lineNumbers": "off",
    "editor.hover.enabled": false, // 도움말 풍선
    "powermode.enabled": true,
    "powermode.enableShake": false,
}
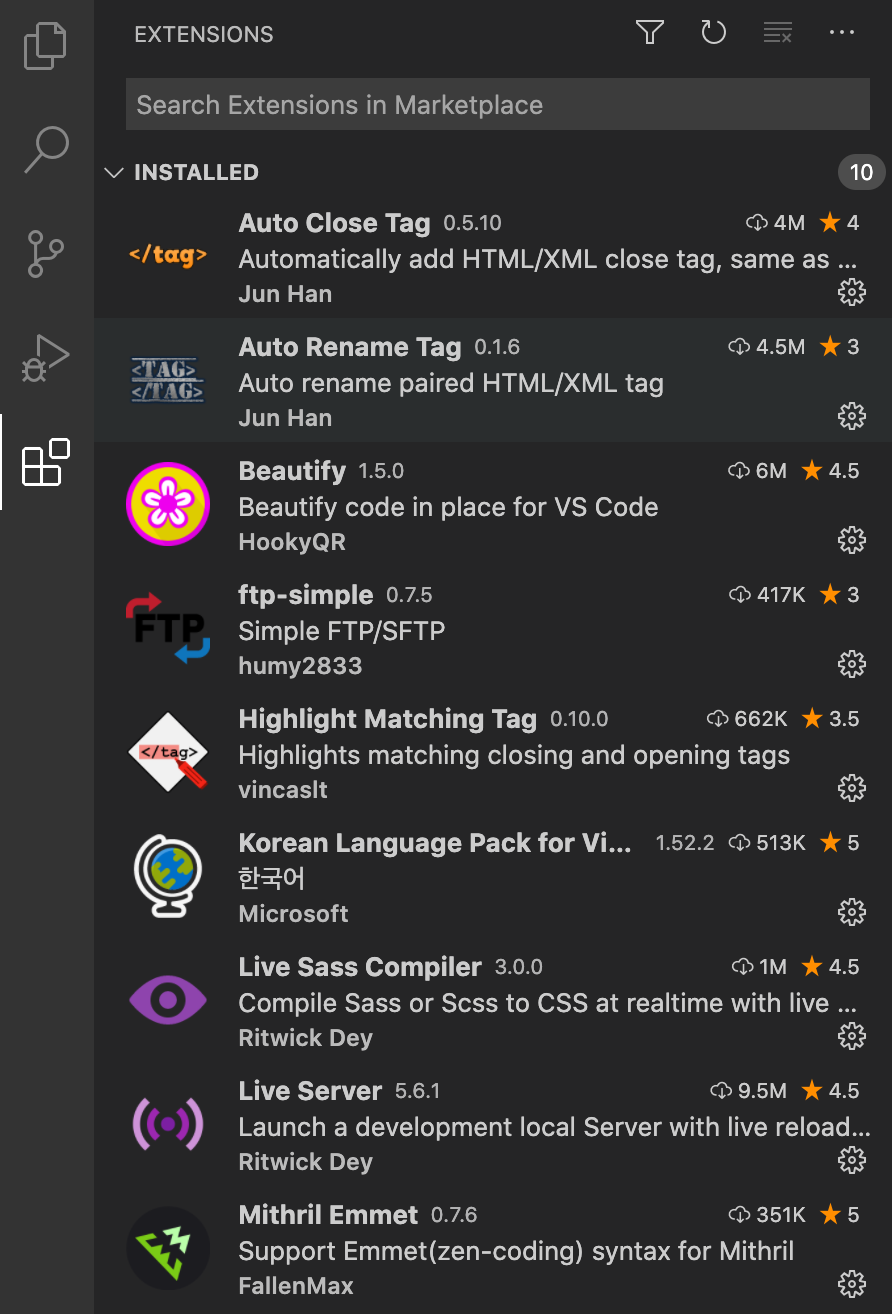
(4) 추천 확장프로그램
왼쪽 메뉴에서 확장 메뉴를 선택 후 아래 프로그램을 설치합니다.

(5) 그 밖에 설정

[바로 가기 키] 설정값
// 키 바인딩을 이 파일에 넣어서 기본값 재정의auto[]
[
    {
        "key": "ctrl+alt+b",
        "command": "HookyQR.beautifyFile"
    },
    {
        "key": "cmd+l cmd+p",
        "command": "liveSass.command.watchMySass"
    },
    {
        "key": "alt+cmd+/",
        "command": "editor.action.blockComment",
        "when": "editorTextFocus && !editorReadonly"
    },
    {
        "key": "shift+alt+a",
        "command": "-editor.action.blockComment",
        "when": "editorTextFocus && !editorReadonly"
    },
    {
        "key": "cmd+g cmd+r",
        "command": "git.ignore"
    },
    {
        "key": "cmd+g cmd+t",
        "command": "git.commit"
    },
    {
        "key": "cmd+p cmd+p",
        "command": "git.push"
    }
]
[사용자 코드 조각] 설정
{
	// Place your snippets for css here. Each snippet is defined under a snippet name and has a prefix, body and
	// description. The prefix is what is used to trigger the snippet and the body will be expanded and inserted. Possible variables are:
	// $1, $2 for tab stops, $0 for the final cursor position, and ${1:label}, ${2:another} for placeholders. Placeholders with the
	// same ids are connected.
	// Example:
	// "Print to console": {
	// 	"prefix": "log",
	// 	"body": [
	// 		"console.log('$1');",
	// 		"$2"
	// 	],
	// 	"description": "Log output to console"
	// }

	"bg" : {
		"prefix": "bg+",
		"body": [
			"background: url() 0 0 no-repeat;"
		]
	},

	"text-indent" : {
		"prefix": "ti--",
		"body": [
			"text-indent: -9999px;"
		]
	},

	"transform" : {
		"prefix": "tr",
		"body": [
			"transform:"
		]
	},
}
(6) 설정 동기화
- 확장 플러그인 Settings Sync 사용한다.
- 깃헙의 토큰만 입력하면 gist id 를 자동으로 생성해주고, gist id 만 복사해서 다른 컴퓨터에서 입력하고 사용하면 된다.
1) 토큰만들기
- github 로그인
- Settings -> Developer settings -> Personal access tockens
- 아래 그림과 같이 Generate new tocken 클릭

- 설명(description)을 대략 적어주고, gist 체크 후 Generate tocken

- 생성된 토큰을 복사해둔다.
2) VScode Setting Sync
- 아래 그림과같이 마켓플레이스에서 Settings Sync 설치 후 리로드

- ctrl+Shitf+p 입력후 명령창에 sync 입력하고 Sync: Update / Upload Settings 선택
- 토큰 입력창이 나오면 이전에 복사해둔 토큰을 입력하고 엔터를 누름
- 출력창에 아래 그림과같이 설정 정보를 확인할 수 있다.

- 이 과정을 진행하면 자동으로 https://gist.github.com 에 본인의 아이디에 만들어진다. 사이트에 접속해서 확인.(Embed <script>안의 url에서 본인 아이디 뒤에 있음)
- 이 아이디를 통해 다른 pc의 VSCode에서 동기화가 가능하다.
3) 다른pc에서 동기화하기
- 다른pc에 설치된 vscode에서 Settings Sync를 설치하고 Ctrl+Shift+p 입력후 명령창에 sync 입력.
- Sync: Update/Upload Settings 선택 후 git 토큰과 gist ID를 차례대로 입력한다.
- 위의 설정 정보 그림에서 Github Tocken과 Github Gist에 해당
- 동기화 필요시 (단축키)
- Shift + Alt + U : 현재설정을 github에 올리기(저장)
- Shift + Alt + D : github에 있는 설정을 내려받아 적용하기
(7) Git 연결
1) Repository 초기화
- 프로젝트에 사용할 특정 폴더 선택해서 열기
- 좌측의 소스제어 메뉴에서 (해당 폴더) 리포지토리 초기화 선택
- 파일을 생성하면(예를들어 readme.md) 소스 제어 아이콘에 추가/변경된 파일 갯수 확인 가능
2) git Add
- 소스제어 메뉴에서 아래 그림과 같이 해당 파일이나, 변경내용(CHANGES)에 마우스를 위치시키면 + 아이콘이 보이고 클릭하여 Stage 처리를 할 수 있다.

- stage 처리 후에 파일을 변경했다면 변경된 파일에 M 상태를 나타내는 아이콘이 표시됨
3) git commit
- Git commit, 아래 그림처럼 커밋 메시지를 입력하고 commit 아이콘을 클릭하면 Local git 저장소로 반영된다.

4) add Remote repository
- Remote Git 추가
- 터미널을 열고(vscode에서 ctrl+` 사용) $ git remote add origin “github repository url”
5) git push
- Remote Repository로 Push, 아래 그림처럼 다음으로 푸시.. 클릭

- 아래 그림처럼 remote add 한 origin, username, password 차례로 입력

(8) 추가 확장 플러그인 (AsciiDoc)
- marketplace에서 AsciiDoc 입력 후 Download
- 새창띄워서 미리보기 : ctrl + shift + v
- 사이드에서 미리보기 :단축키 : ctrl + k v
- 이외에 확장프로그램은 https://junistory.blogspot.kr/2017/06/visualstudio-code_22.html 참고
Links
- http://gomcine.tistory.com/entry/VS-Code-%EC%84%A4%EC%B9%98-%EB%B0%8F-%EC%84%B8%ED%8C%85%ED%95%98%EA%B8%B0
- http://gomcine.tistory.com/entry/VS-Code-%EA%B8%B0%EB%B3%B8-%EC%84%B8%ED%8C%85
- http://webnautes.tistory.com/905
- https://wiki.modernpug.org/pages/viewpage.action?pageId=8029113
- https://demun.github.io/vscode-tutorial/
- http://bimmermac.com/1242
- http://ccambo.gitlab.io/2017/07/09/VSCODE-VSCode%EC%97%90-Git-%EC%82%AC%EC%9A%A9%ED%95%98%EA%B8%B0/
- http://demun.tistory.com/2514
'TOOL' 카테고리의 다른 글
| Line Awesome 사용하기 (0) | 2020.07.30 |
|---|---|
| Mac 키보드 단축키 (0) | 2020.04.10 |
| 맥북 단축키 (1) | 2020.02.28 |
| 와이어프레임/프로토타입 제작에 유용한 라이브러리 (0) | 2020.02.06 |
| FileZilla 설치하기 (1) | 2020.02.06 |